Quantcast
Channel: Search Results for “root app for techno”– Android Logi
Viewing all 11 articles
Browse latest View live

How To Root Innjoo Max 2 Plus

$
0
0
To all handlers of Innjoo Max 2 Plus who has been trying or attempting to gain root access and also looking for a suitable custom recovery to install on their device only to end up with a failed attempt. Here is a confirmed, working and reliable guide to finally root your Innjoo Max 2 plus and enjoy the benefit of a rooted and custom recovery installed Android.

http://www.techvillaz.com/2016/02/how-to-root-innjoo-max-2-plus.html


In this article, I’ll be guiding you on how to install TWRP recovery mode on your Innjoo Max 2 plus and also how to root Innjoo Max 2 plus afterwards.


Before we proceed, I’ll love to give credit to Team Hovatek for porting the TWRP recovery image which we will be using in this guide..


Requirements:

→ PC/ Laptop running windows
→ SP Flash tools. Download
→ SuperSu.zip. Download

→ VCOM drivers. (Installation Guide).  You can also plug your device to your pc to auto detect and install needed drivers or download and install Pdanet from here to install your device needed drivers.

→ TWRP recovery img and scatter file for Innjoo Max 2 plus. Download
→ Working USB cable
→ A little patience


How To Install TWRP Recovery On Innjoo Max 2 Plus

Step 1: First download the recovery zip file from above link and then extract the “Recovery.img” and “MT6580_Android_Scatter.txt” file to the desktop screen of your computer or create a folder and extract to it, as seen in the image below.

Techvillaz How To Root Innjoo Max 2 Plus


Step 2: Next, download SP Flashtools and extract the files to another folder on your computer. You should get the following files as seen below after extraction.


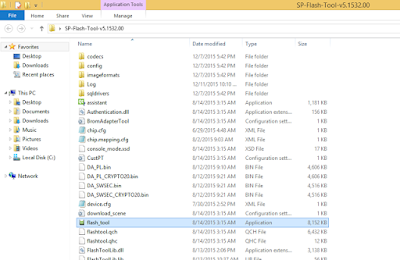
Step 3: From the extracted files, open “Flash_tool.exe”
Step 4: Once the flash tool is launched, then click on “scatter loading” button.

Step 5: Now, locate the “MT6580_Android_Scatter.txt” file, which you extracted and open. you should be seeing below image afterward. Tick on “Recovery” only and uncheck others.


Step 6: After that, click “Download” button

Step 7: Immediately, switch off your device completely and connect your device to your computer via USB cable

Step 8: The Flashing process would be in progress, and a Green button would appear once the process is completed.


That’s it. ClockwokMod Recovery is now installed on your Innjoo max 2 plus device. To boot to recovery mode, simply press and hold Volume Down button + Power button for 5sec. Now lets proceed to rooting Innjoo max 2 plus.


How To Root Innjoo Max 2 Plus

Step 1:  Firstly, download the SuperSU file from here, and move the downloaded file to the internal/ external storage of your device

Step 2:  Now, switch off your device and boot to recovery mode (press and hold Volume Down button + press Power button).

Step 3:  In TWRP, if you get a prompt asking you to swipe to allow TWRP modify the system partition, then go ahead and swipe. To swipe, place your finger on the green circle then slide it to the right

Step 4:  In TWRP recovery, tap Install and Navigate to the location of the SuperSU.zip and select it 

Step 5:  Swipe to confirm flashing of SuperSU.zip and wait till flashing is complete and reboot the phone normally

That’s it, your device has now gotten root permission. You can download Root Checker from playstore to verify root.

Techvillaz How To Root Innjoo Max 2 Plus


Hit the share button to share this article with your friends… Your comment is welcome.

How To Root Infinix Hot 2 X510 LTE Version

$
0
0
Techvillaz How To Root Infinix Hot 2 X510 LTE Version

Infinix Mobility will not rest until the fully satisfy their fans. I never knew Infinix Mobility has unleashed the LTE version of Infinix Hot 2, not until a friend of mine on the internet mailed me about it and also requesting for a way to get it rooted. Well, thanks to Team Hovatek who has been porting Custom recovery image for almost all the trending MTK smartphone thereby making rooting possible.

To root your Infinix Hot 2 LTE version, we will be installing Clockwokmod recovery first which we will then use it to actually gain root permission afterwards. Ensure you follow bellow guide carefully.

NOTE: You can also use the latest Kingroot Apk app to attempt root on the Infinix Hot 2 LTE version. If that doesn’t work, use below method

GUIDE TO ROOT INFINIX HOT 2 LTE VERSION
  1. Install VCOM drivers on your PC. (Installation Guide).  Go Here to use Pdanet method
  2. Download SuperSU.zip from here and copy SuperSU.zip to both the phone’s SD card and internal storage
  3. Download Clockwokmod recovery (CWM) for Infinix Hot 2 X510 LTE version ported by Team Hovatek. Download
  4. Switch-off  the device completely (still with battery inside)
  5. Flash the Clockworkmod recovery.img to the phone using SP Flash tool. (See Detailed Guide)
  6. After successfully flashing Clockwokmod recovery, boot the phone into recovery mode using Volume up button + Power button.
  7. In Clockworkmod recovery mode, you use the Volume up button to scroll up, Volume down button to scroll down and Power button to select. So, scroll down to “Install zip” and select it Select.
  8. Choose zip from /storage/sdcard1 and navigate to where you put SuperSu.zip and select it.
  9. Select Yes – Install SuperSU to confirm flashing
  10. Wait till flashing is complete
  11. After flashing is done, return to the recovery main menu (using the back option) then select Reboot
  12. If CWM offers to help fix a missing Root, select No

That’s it, your Infinix Hot 2 LTE version has now been rooted. To confirm root access, download and install root Checker from Google Play Store.

CREDIT:
TEAM HOVATEK 

Incoming search terms:

How To Root Infinix Hot S

$
0
0

To root lovers and all handlers of Infinix Hot S, here is a reliable method to root your Infinix Hot S device after several attempt to gain root using kingroot one click apk app which seems not to be working for Android 6.0 but thanks to Team Hovatek, a working method has surfaced to make rooting Infinix Hot S possible

root infinix hot s


In this article, i will be showing you how to install TWRP custom recovery and then use it to root your Infinix Hot S afterwards.


THINGS NEEDED

Infinix Hot S
Working USB Cable
PC
Sp Flashtools
Vcom Drivers installed on PC
TWRP recovery for Infinix Hot S ported by team hovatek

SuperUser_v2.66.zip

 
How To Install Twrp And Root Infinix Hot S
  1. Install VCOM drivers on your PC using the manual method here or go here to use Pdanet method
  2. Download SuperSU 2.66.zip here.
  3. Copy SuperSU.zip to both root of SD card and internal storage
  4. Download TWRP recovery for Infinix Hot S Marshmallow here
  5. Now, switch off the phone completely (still with battery inside)
  6. Flash the Twrp recovery.img to the phone using SP Flash tool. See how to flash/ install custom recovery using Sp flashtools at http://www.techvillaz.com/2015/12/how-to-install-custom-recovery-on.html?m=1
  7. After flashing or installing Twrp recovery, boot the phone into recovery mode using Volume up button + Power button for 5sec.
In TWRP, if you get a prompt asking you to swipe to allow TWRP modify the system partition then go ahead and swipe. To swipe, place your finger on the green circle then slide it to the right
  • In TWRP recovery, tap Install
  • Navigate to the location of the SuperSU.zip and select it
  • Swipe to confirm flashing of SuperSU.zip and wait till flashing is complete.
  • Reboot the phone normally
  • Confirm Root by installing and running Root Checker
 
Thats it, you have successfully rooted your Infinix Hot S via Twrp recovery mode. Your comments and feedback will be appreciated.
 
 
CREDIT:
Team Hovatek

Incoming search terms:

How to Root Lenovo A6000

$
0
0

Hearing 25000 devices getting sold out in 3 seconds is a new news these days, This trend began with Xiaomi’s MI3 smartphone and is still in action. The A6000 is one of the best smartphones when it comes to budget smartphones. Rooting the smartphones is like playing with your smartphones these days. Previously one had to wait for months to get a rooting guide, but these days the very next day after release the rooting guides are ready.

Android is an open source operating system based on Linux Kernel, and to perform certain actions like installing custom OS, overclocking the CPU, tweaking the android phone permissions from the SuperUser is required. The superuser is a special user whose permissions are required when you are trying to get into the internal of Android.

lenovo-a6000-1024x722

How to Root Lenovo A6000 Easily?

It’s already known that rooting devices from certain brands voids the warranty. The Lenovo A6000 have great specs and works smooth. However, like water is required by living beings for survival, Android geeks can’t survive without rooting. In this guide you will be guided with steps to root your Lenovo A6000 Easily, so even if you are very new to Android, you’ll be able to root your Lenovo A6000 at an ease.

Disclaimer : Neither Droidmen nor the Author will be responsible in case any damage takes place while or after following this guide. 

Things Required

  • Lenovo A6000 Smartphones.
  • 80% Battery charge or more than it.
  • Custom Recovery Installed.(TWRP Recovery Recommended)
  • Download  Root-SuperSU-v2.37.zip.

STEPS TO ROOT THE LENOVO A6000 SMARTPHONE

  1. Download the Root SuperSU from the link provided in the things required section, if you’ve already download then skip this step.
  2. Transfer the SuperSU Zip File in the Internal or External storage of the phone.
  3. Boot into recovery mode by pressing “Power + Volume Up + Volume Down” for few seconds and release the buttons as soon as the boot screen appears.
  4. Depending on the recovery installed : Click on Install Zip and select the SuperSU Zip file which you downloaded and click on install. That’s it, now clear cache and dalvik cache and reboot into system (Reboot your Smartphone)
  5. That’s it you’ve successfully rooted your Lenovo A6000.

Was it difficult to follow? Did we miss something? Let us know and we will try our best to help you, Wait its not the end! How do you know whether the guide worked i.e. How do you check whether your Lenovo A6000 is rooted or not? Go to playstore and download the Root checker app and install it, Run it and check the root status of your Lenovo A6000? Rooted eh? Yureka you’ve done it!

source : https://www.droidmen.com/steps-to-root-lenovo-a6000/

Incoming search terms:

How To Root Tecno Camon C9

$
0
0
how to root tecno c9

Recently Tecno launched Camon C9, a beastly lovely device to add to its C device family and many Android lovers went for it. To many, it is a complete device but to those who can’t do without root inorder to install custom recovery and also tweak as desired, it is not yet a complete Android.

Kingroot one click rooting app has been a very helpfull rooting app for most MTK phones to gain root access but ever since Android 6.0 came to play, rooting has not been easy on the new OS and hopefully, Kingroot team will do something about this.

While the waiting, there is another effective and reliable method to root most Android running on 6.0 and this article, i will be showing us how to Install CWM recovery on Tecno C9 and also root Tecno Camon C9 afterwards. Do follow below procedures step by step.

REQUIREMENTS:
→ PC
→ Working USB Cable
→ SuperUser.zip – Download here
→ Your Camon C9 bootloader must be unlocked. See detailed tutorial on how to unlock Tecno C9 bootloader
→ CWM Recovery for Tecno C9. Download here

Granted you have met the requirements, lets begin…

How To Root Tecno Camon C9

After you must have unlocked your Tecno C9 bootloader which is very important and have also
downloaded the required files from above, do the following:

1.  Copy SuperUser.zip and place it in the root of your SD card, (Don’t put it in any folder)

2.  Extract and copy CWM recovery.img into the
same folder containing fastboot.exe and adb.exe

3.  Without putting off your phone, connect your phone to your PC via USB cable and boot it into fast boot as shown in the bootloader unlocking guide.

4.  Once your device is in fastboot mode, flash the CWM recovery.img to your phone by typing the below command code in red and press “ENTER” from your PC keyboard to flash/ install CWM recovery to your device.

CODE: flash recovery recovery.img

5. After that, reboot the phone by typing the below command code and press “ENTER”.

CODE: fastboot reboot

6.  After rebooting your phone, switch it off and boot to recovery mode by pressing and holding Volume Up + Power Button for few seconds to boot into CWM recovery mode.

7.  Now in CWM recovery mode, use the volume keys to navigate and the power button to enter..

→ Navigate to “Install Zip”
→ Select “Choose From SdCard”
→ Locate SuperUser.zip, select it and then select “YES” to install.

8.  Now, after installing SuperUser.zip, simply go back to CWM main menu and reboot.

9.  If the Cwm recovery offers to fix some errors, select “NO”.

Thats it, you have succesfully rooted your Tecno Camon C9. To verify root, download root checker.apk to verify.

Your feedback and comments will be appreciated. Do share this articles with your friends…

How To Easily Root Samsung Galaxy A9 Without PC

$
0
0
How To Easily Root Samsung Galaxy A9 Without PC

Today we are sharing an easy way to root the all new Samsung galaxy A9 with the help of one click root android tool. This simple and easy rooting guide is applicable to both galaxy A9 [2015] and galaxy A9[2016] . the method of rooting is very easy and you will easily root your samsung Galaxy A9 without Pc following this method.

HOW TO ROOT SAMSUNG GALAXY A9

To easily root your Samsung Galaxy A9, follow below guide.


WHAT’S NEEDED?

★ Your Samsung Galaxy A9
★ kingroot apk app. Download
★ Internet connection.
★ And a little patience.
PROCEDURES

  1. Download kingroot from given link and install.
  2. Turn-On your internet connection. Ensure you have atleast 10MB data.
  3. Launch the kingroot app and click on the “Try to root or root button”.
  4. Just wait while kingroot tries to root your device.

NB: You may get a prompt to install an app. Ignore the warning, mark the checkbox and tap “Install anyway”.

Congratulations!! You just rooted your Galaxy A9 Android device.

Again, your phone may reboot during the rooting process, do not panic, its normal

Incoming search terms:

How To Root Tecno L8 And L8 Plus Without PC

$
0
0
how-to-root-tecno-l8-plus

Rooting an Android device and also installing custom recovery is one among the things every Android users must do after getting Android phone. Why? because a rooted Android gives its user administrative privileges which can’t be given when not rooted. A rooted Android can enable you bypass manufacturers restrictions, you can have control of your Android.

Tecno L8 plus Stock Rom
TWRP Recovery For Tecno L8 plus

A rooted Android enables you install custom recoveries, use apps full features that demands root access, control app permissions, etc.. Infact, an Android without root permission is not yet a complete Android.

In this article, i will be guiding you on how to simply root your Tecno L8 plus without PC to enjoy the benefits of a rooted Android phone.

How To Root Tecno L8 & L8 plus

1. To easily root your Tecno L8 plus, download and install latest version of Kingroot apk app from here,

2. Turn-on your device internet connection. Ensure you have data (not much though)

3. Launch kingroot, allow it to process your device and click on “Root Now”.

4. At this point, do not operate your phone, allow kingroot to do its thing and your Tecno L8 plus will be rooted in no time

NOTE: Your device may reboot during root process, do not panic, its normal. If root fails, ensure your internet connection is strong and redo root process.

Personally used this method to root my Tecno L8 plus after unboxing…

Incoming search terms:

Root Your Android Lollipop 5.0, 5.1 And Marshmallow 6.0 Using The Latest KingRoot v4.8.2

$
0
0

KingRoot as the name implies is the best one click apk app used in rooted MTK devices. Recently, kingroot was only able to root MTK devices running on Android 4.4 Kitkat based OS but unable to root the latest OS such as Android Lollipop 5.0/ 5.1 and Android Marshmallow 6.0 thereby forcing users running the latest OS to scout for ways to root and install custom reciveries on their device. So far so good, a reliable method came up which was the nethod of using PC to install custom recoveries so as to gain root access afterwards but that was not really good enough because many who didn’t really know how ended up with a bricked device but to the geeks and those who knew how benefited from the method and are still benefiting till date.

GOODNEWS! Team Kingroot had users running the latest OS in mind and i must say, they have really done a great job by upgrading our best one click root app to be able to root the latest Android OS. This latest version has the highest chance of rooting almost all Android devices running on the bygone Froyo, Gingerbread, Jelly Bean, KitKat, and the latest tasty Android 5.1 Lollipop and Marshmallow 6.0.

If you are one among those who don’t like to flash any third party Recovery into your lovely device Android 4.4.2, 5.1 and 6.0 using the PC method, then you definitely need to try this latest version of Kingroot. Personally tested the new version and it successfully rooted Infinix Zero 2 and Hot Note Pro running the latest Android 5.1 XUI and there is a possibility of gaining root access on Marshmallow 6.0 using the newly updated Kingroot.


WHAT’S NEW IN KINGROOT VERSION 4.8.2?

→ New function to increase system running speed with one click

→ Comprehensive upgrade from Kai management and pre-uninstall features

→ Root enhance security capabilities, the software run more secure

→ Updating the software architecture, the standby memory footprint reduction of 45

→ Now working for Android 5.1 lollipop
→ Focus more attention on keeping your device safe after root 
→ Some bugs are fixed.

It’s important to know that KingRoot doesn’t work with all type devices, but you can give it a short.


http://kingroot.en.uptodown.com/android/download
KINGROOT V4.8.2


HOW TO ROOT YOUR MTK DEVICE USING THE LATEST KINGROOT V4.8.0

There is nothing special in its steps as it is the usual method you’ve been using but if you are new to Kingroot, just check any of our previous tutorial on how to root using kingroot. 

Simply install the new updated Kingroot v4.8.2, launch and follow the on-screen instruction. During the process, if the phone reboots, don’t panic, your phone is safe.


NOTE: As usual, you will need a steady and fast internet connection on the phone before the rooting process can be done. If first rooting fails, try again.

Incoming search terms:


How To Easily Root Huawei Ascend Y520

$
0
0

Rooting is one among the first thing every Android smartphone users needs to do. Why? Because gaining root access on Android is akin to running Windows as an administrator. You have full access to the system directory and can make changes to the way the OS operates. As part of rooting, you install usage manager (SuperSU is the main one right now). These tools are basically the gatekeeper of root access on your phone. When an app requests root, you have to approve it using the root manager.

In this article, I’ll be showing you how to easily root Huawei Ascend Y520. Follow below steps and in no time, your device should be successfully rooted


How To Root Huawei Ascend Y520

1. Download “Super-Root.apk” for Huawei Ascend Y520 from here and install to your device
2. Goto your apps menu and launch it.

3. Select “Install SuperSU” from the first dropdown menu.

4. Select exploit, tap on it in the app.

5. The app should begin rooting your device, shouldn’t take too long to finish.

6. Reboot your device once it’s been rooted.

7. You’re all done! Excellent! You’ve successfully rooted your Android device using the Super-Root.apk app and you should now be able to see the SuperSU app in your App Drawer!

Incoming search terms:

How To Root All Sony Devices

$
0
0


SONY DEVICES:

1. Root Sony Xperia Z Ultra

a) vroot program

2. Root Sony Xperia T

a) root package

3. Root Sony Xperia Sola Running On 6.1.1.B.1.54 Firmware

a) Root file
b) flashtool file
c) kernel.zip

4. Root Sony Xperia M

a) Framaroot.apk file

5. Update Sony Xperia Sola With Kit Kat 4.4 Firmware

a) Google apps package

6. Root Sony Xperia Z Smartphone

a) Sony Xperia Z drivers
b) Fastboot drivers
c) rooting script

7. Update Sony Xperia S With Kit Kat 4.4 Firmware

a) Kit Kat 4.4 package

8. Root Sony Xperia 2011 Devices With ICS (4.1.B.0.587)

i)Kernel 4.1.A.0.562 to flash

a) Arc and Arc S
b) Neo/Neo V
c) Ray
d) LwW, Mini
e) All other users Kernel

ii) Toolkit

iii) Kernel

a) Mini
b) Arc
c) Arc S
d) Neo
e) Pro
f) Active
g) Ray
h) Neo V
i) Mini Pro (Will Update link shortly)
j) Live with Walkman

9. Root Sony Xperia ZL (C650X)

a) SuperSU
b) Advanced Stock Kernel

10. Root Sony Xperia U Using One Click Method

a) Root Package

11. Unroot The Sony Xperia Tipo (St21i)

a) Root Package

12. Root Sony Xperia Tipo (St21i) And Install CWM Recovery

a) Unlock Root Tool
b) CWM Recovery

13. Root Sony Xperia J Without Unlocking The Bootloader

a) Bin4ry root tool

14. Install The Newest Firmware On Sony Xperia Tipo ST21i

a) Flashtool 
b) Latest android 4.0.4

15. Upgrade CM10 JellyBean ROM On Sony Xperia Tipo

a) CM10 Jellybean ROM
b) Google apps

16. How To Unroot Sony Xperia Z Ultra

Flashtool and FTF firmware

17. How To Root Sony Xperia SP Running On 12.0.A.2.254

Xperia SP_C530X_12.0.A.1.257_KernelOnly.ftf (flashtool)
DooMLoRD_Easy Rooting Toolkit-V_18_perf-event-exploit.zip
Xperia SP_C530X_12.0.A.2.254_KernelOnly.ftf (flashtool)

18. How To Root Sony Xperia C (C2305)

Rooting package

19. How To Root Sony Xperia E Dual Using Fastboot

a) XperiaEDual.elf
b) Android.zip
c) DooMLoRD v1-root-insecure-busybox-zu.zip

20. How To Root Sony Xperia M Dual (C2004/C2005) Jelly Bean 4.2.2 Build [15.2.A.1.12]

a) vRoot app

21. How To Root Sony Xperia SP Running On Latest 12.1.A.0.266 Firmware

a) Supersu.zip

22. How To Root Sony Xperia ZR

a) One click root tool

23. How To Root Sony Xperia V LT25i Smartphone:

a) Kernel.elf 
b) SuperSu.zip 
c) Stock android 4.3 Jelly Bean Kernel.sin

24. How To Root Sony Xperia Tablet S (SGPT121 US Model):

a) ADB Tools
b) SonyTabletICS-2.zip
c) Superuser-3.1.3-arm-signed.zip
d) VpnFaker.apk

25)How To Root Sony Xperia SP 12.0.A.2.254 (New Method)

a)Flashtool

26)How To Root Sony Ericsson Live With Walkman (WT19i).

a)Eroot rooting kit.

27)How To Root Sony Xperia Z2 Smartphone.

a)Rooting Tool.
b)Root Checker.

28)How To Root Sony Xperia C Without Computer.

a) .apk file.

29)How To Update Sony Xperia Z1 With Android 5.0 Lollipop OS.

a)Lollipop AOSP 5.0 Package.
b)adb_fastboot_files.

30)How To Root Sony Xperia M C1904/1905.

a) Rootkit.

31)How To Install Dark Xperia Z2 ROM On Xperia C.

a) custom recovery.
b) Dark Xperia Z2 ROM Package.

32)How To Unroot Sony Xperia C Smartphone.

a) Root Genius.

33)How To Install DiXperia ROM On Xperia Z2.

a)DiXperia ROM Package.

34)How To Root Sony Xperia C3 Dual (D2502 & D2503).

a) unlock bootloader.
b) Flashtool
c) CWM
d) SuperSU

35) How To Root Sony Xperia Z3 (D6653/D6603/D6633)

a) Advanced Kernel Image:

D6653 / D6603 23.0.1.A.5.77

D6653 / D6603 23.0.A.2.105

D6653 / D6603 23.0.A.2.93

D6633 23.0.F.1.74

b) SuperSU

c) Fastboot

37) How To Root Sony Xperia X8 And Install Custom Recovery

a) SuperOneClick

b) xRecovery

c) Root Explorer

Incoming search terms:

Huawei P8 Android Firmware & ROM Marshmallow

$
0
0

4272015121935pm_635_huawei_ascend_p8_lite

Huawei P8 is flagship for 2015. It is a very based thinker from Huawei. In this article, i will reveal you how to set up foreign money firmware edition for this philosopher, which is presently working Android 6.0 Marshmallow. I will demonstrate you more tutorials for set up it and important steps are confirmed on the video. The article is continuously replace by myself to all the time brings the finest consumer adventure with your Huawei smartphone.

An important suggestions for the start – earlier than you start to do some thing with your Android phone, do the backup of your personal knowledge. It is only for your protection in a case that anything is going wrong or any mistake completely satisfied. In that case you can use the backup to repair the information and are trying to do every little thing once once more. Each academic has been carried out many times to ascertain its propriety, so just read rigorously all commands and proceed step by step. The major part of every dossier has been created by myself and every dossier has been verified on the corresponding phone. In this instruction associated to the Huawei Mate S you can find a few photograph and movie theater appearing how to continue, however the most important thing are the beneath written manuals. And one more thing – i really like that you select Huawei philosopher or pill for you, it is a good alternative. You can improve your phone to the new firmware, however you can additionally make a downgrade, however there is one important distinction. When you are making improve, all your information are safe. however when you make downgrade, all your info will be removed.

One more caution for now – Huawei produce more types of every thinker, so Huawei Mate S in Chine is not soak up similar with Huawei Mate S in Europe. That is main reason, why there is chance, that you will obtain new firmware from this site, however when you start an replace, there will be challenge with mounted and the phone will write anything like – utility set up Failed. It is not a big challenge, because your usual firmware is still in your phone, however this mean that you need to find the corresponding firmware edition for your thinker. This can be additionally challenge, when you are installation a few kind of OTA (OverTheAir) replace. When there is the OTA replace obtainable, there is at all times an tips about edition, which you have to be operating earlier than you start this OTA. For instance if you want to set up the OTA replace number B331 for Huawei Mate 7, you need to be on the edition B324 first. There is additionally many CUSTC numbers (every place and market can have various CUSTC – it mean, where the phone was at first promote) so additionally verify this thing, earlier than you start. however phone enable you only set up the corresponding edition, so go for it…

How to install Android 5.0.1 Lollipop firmware
1. first of all, check your firmware version (if you already have the latest one, you do not need this tutorial)
2. make backup of all your personal data and charge a battery in your phone to 100% (optional)
3. download Android 5.0.1 Lollipop CUSTC432 B200 for Huawei P8
4. rename the downloaded file to update (extension .app is important there, don’t change it)
5. create folder dload in root of your internal storage or on your microSD card and place the update.app file here (video below show it)
6. go to settings/update and hit menu button and than choose Local update
7. if you copy the update.app file correctly, there will be this file shown now, tap on it and start installation
8. wait until update is done, you have latest firmware in your smartphone

How to install Beta Android 5.1.1 Lollipop firmware
1. first of all, check your firmware version (if you already have the latest one, you do not need this tutorial)
2. make backup of all your personal data and charge a battery in your phone to 100% (optional)
3. download Android 5.1.1 Lollipop B191 for Huawei P8
4. unzip downloaded file in your computer
5. copy folder dload (with update.app file) in root of your internal storage or on your microSD card (video below show it)
6. go to settings/update and hit menu button and than choose Local update
7. if you copy the update.zip file correctly, there will be this file shown now, tap on it and start installation
8. wait until update is done, you have Android 5.1.1 Lollipop in your smartphone
9. now repeat all steps with OTA update file B350 for Huawei P8, now you will get latest version

How to install Android 6.0 Marshmallow firmware
1. first of all, check your firmware version (if you just have this firmware, you doesn’t need this tutorial)
2. make backup of all your personal data and charge a battery in your phone to 100% (optional)
3. download Android 6.0 Marshmallow B380 for Huawei P8
4. create folder dload in root of your internal storage or on your microSD card and place the update.app file here (video below show it)
5. go to settings/update and hit menu button and than choose Local update
6. if you copy the update.app file correctly, there will be this file shown now, tap on it and start installation
7. wait until update is done, you have Android 6.0 Marshmallow in your smartphone

How to downgrade from Android 6.0 Marshmallow firmware to Android 5.0.1 Lollipop
1. make backup of all your personal data and charge a battery in your phone to 100% (optional)
2. download this transition package for Huawei P8
3. rename the downloaded file to update (extension .app is important there, don’t change it)
4. create folder dload in root of your internal storage and place the update.app file here
5. turn off your phone and than power it with holding all three buttons together (release them when you see Huawei logo)
6. wait until first part of downgrade will be fine, than you will have transition firmware B300
7. download newest stock ROM for Huawei P8
8. rename the downloaded file to update (extension .app is important there, don’t change it)
9. create folder dload in root of your internal storage and place the update.app file here
10. turn off your phone and than power it with holding all three buttons together (release them when you see Huawei logo)
11. wait until second part of downgrade will be fine, than you will have Android 5.0.1 Lollipop

Incoming search terms:

Viewing all 11 articles
Browse latest View live


Latest Images